コメントプレビューでカスタムフィールドの値を表示する
Movable Typeのコメントプレビュー画面でコメントのカスタムフィールドの値を引き継いで表示するカスタマイズを紹介します。
1.問題点
コメントのカスタムフィールドをコメント投稿フォームに表示する方法は次のようになっています。
<input type="hidden" name="blog_id" value="<MTBlogID>" />
<input type="hidden" name="customfield_beacon" value="1" id="customfield_beacon" />
<mt:CommentCustomFields>
  <mt:SetVarBlock name="custom_field_name"><$mt:CustomFieldName$></mt:SetVarBlock>
  <mt:SetVarBlock name="field-content"><$mt:CustomFieldHTML$></mt:SetVarBlock>
  <mt:SetVarBlock name="custom_field_id">profile_<$mt:CustomFieldName dirify="1"$></mt:SetVarBlock>
  <$mt:Include module="フォームフィールド" id="$custom_field_id" class="" label="$custom_field_name"$>
</mt:CommentCustomFields>ただし、このサブテンプレートとコメントプレビューテンプレートに設定しても、ドロップダウンやラジオボタンなど、一部の形式のカスタムフィールドについては値が引き継がれないようです。
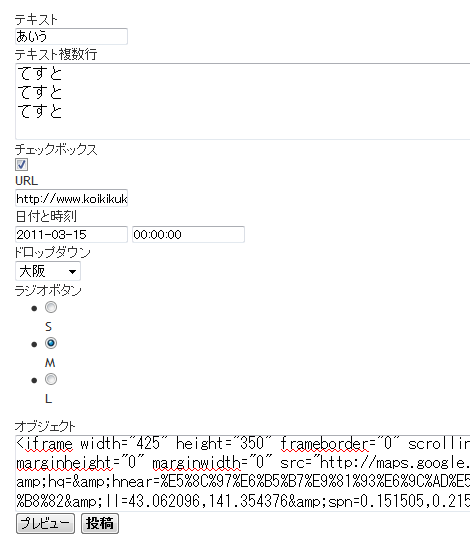
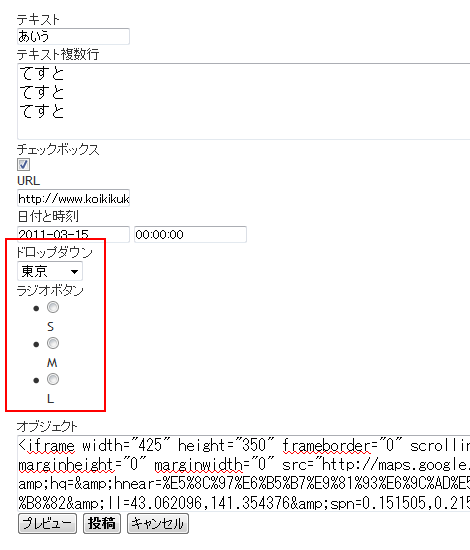
試しに、コメントカスタムフィールドのすべての種類を登録して、ブログ記事ページのコメントフォームとコメントプレビューのコメントフォームの表示を比較してみました。
ブログ記事ページのコメントフォーム

コメントプレビューのコメントフォーム

この結果、赤枠で括ったドロップダウンとラジオボタンの値が引き継がれていないことが分かりました。次項ではドロップダウンとラジオボタンの値を引き継ぐ対処方法を紹介します。
2.対処方法
まず、「CustomFieldExtensionTagsプラグイン」と「Splitプラグイン」をインストールしてください。
次に、コメントプレビューテンプレートのform要素の中に次のサブテンプレートを記述します。
<input type="hidden" name="blog_id" value="<MTBlogID>" />
<input type="hidden" name="customfield_beacon" value="1" id="customfield_beacon" />
ドロップダウンを表示したい場合、コメントプレビューテンプレートのform要素の中に次のサブテンプレートを記述します。
<mt:CommentCustomFields>
  <mt:if tag="CustomFieldType" eq="select">
<label for="customfield_<mt:CustomFieldBasename />"><mt:CustomFieldName /></label>
    <mt:CustomFieldOptions split="," setvar="selectdata" />
<select name="customfield_<mt:CustomFieldBasename />">
    <mt:loop name="selectdata">
      <mt:GetVar name="__value__" setvar="option_data" />
  <option value="<mt:GetVar name="option_data" />"<mt:if tag="CommentCustomFieldValue" eq="$option_data"> selected="selected"</mt:if>><mt:GetVar name="option_data" /></option>
    </mt:loop>
</select>
  </mt:if>
</mt:CommentCustomFields>
ラジオボタンを表示したい場合、コメントプレビューテンプレートのform要素の中に次のサブテンプレートを記述します。
<mt:CommentCustomFields>
  <mt:if tag="CustomFieldType" eq="radio">
<label for="customfield_<mt:CustomFieldBasename />"><mt:CustomFieldName /></label>
    <mt:CustomFieldOptions split="," setvar="radiodata" />
    <mt:loop name="radiodata">
      <mt:GetVar name="__value__" setvar="option_data" />
<input type="radio" name="customfield_<mt:CustomFieldBasename />" value="<mt:GetVar name="option_data" />"<mt:if tag="CommentCustomFieldValue" eq="$option_data"> checked="checked"</mt:if> /><mt:GetVar name="option_data" /><br />
    </mt:loop>
  </mt:if>
</mt:CommentCustomFields>
3.複数のドロップダウンやラジオボタンを表示する方法
表示したいドロップダウンやラジオボタンが複数存在する場合は、前項のMTIfタグでMTCustomFieldTypeタグを判定している箇所を、MTCustomFieldBasenameタグやMTCustomFieldNameタグなど、一意になる値に置き換えて判定します。
例えば、表示したいドロップダウンのベースネームが「cf_6」の場合は、前述のサブテンプレートの2行目を次のように書き換えます(青色部分)。
<mt:CommentCustomFields>
  <mt:if tag="CustomFieldBasename" eq="cf_6">
  …中略…
なお、1項も含め、複数のカスタムフィールドを表示する場合は、一番外側にあるMTCommentCustomFieldsタグはひとつずつに与えるのではなく、すべてのカスタムフィールドを次のようにまとめてひと括りにしてください(青色部分)。
<mt:CommentCustomFields>
  <mt:if tag="CustomFieldBasename" eq="cf_6">
  …中略…
  </mt:if>
  <mt:if tag="CustomFieldType" eq="radio">
  …中略…
  </mt:if>
  <mt:if tag="CustomFieldBasename" eq="cf_8">
  …中略…
  </mt:if>
</mt:CommentCustomFields>
4.他の種類を表示する方法
1項・2項の対処を行うことで必然的に他の種類もフォームを手作りすることになりますので、一通り掲載しておきます。
テキストの場合
<mt:CommentCustomFields>
  <mt:if tag="CustomFieldType" eq="text">
<label for="customfield_<mt:CustomFieldBasename />"><mt:CustomFieldName /></label>
<input type="text" name="customfield_<mt:CustomFieldBasename />" id="customfield_<mt:CustomFieldBasename />" value="<mt:CommentCustomFieldValue>" />
  </mt:if>
</mt:CommentCustomFields>
テキスト(複数行)の場合
<mt:CommentCustomFields>
  <mt:if tag="CustomFieldType" eq="textarea">
<label for="customfield_<mt:CustomFieldBasename />"><mt:CustomFieldName /></label>
<textarea name="customfield_<mt:CustomFieldBasename />" id="customfield_<mt:CustomFieldBasename />"><mt:CommentCustomFieldValue></textarea>
  </mt:if>
</mt:CommentCustomFields>
チェックボックスの場合
<mt:CommentCustomFields>
  <mt:if tag="CustomFieldType" eq="checkbox">
<label for="customfield_<mt:CustomFieldBasename />"><mt:CustomFieldName /></label>
<input type="checkbox" name="customfield_<mt:CustomFieldBasename />" id="customfield_<mt:CustomFieldBasename />"<mt:if tag="CommentCustomFieldValue"> checked="checked"</mt:if> />
  </mt:if>
</mt:CommentCustomFields>
URLの場合
<mt:CommentCustomFields>
  <mt:if tag="CustomFieldType" eq="url">
<label for="customfield_<mt:CustomFieldBasename />"><mt:CustomFieldName /></label>
<input type="text" name="customfield_<mt:CustomFieldBasename />" id="customfield_<mt:CustomFieldBasename />" value="<mt:CommentCustomFieldValue>" />
  </mt:if>
</mt:CommentCustomFields>
日付と時刻の場合
<mt:CommentCustomFields>
  <mt:if tag="CustomFieldType" eq="datetime">
<label for="customfield_<mt:CustomFieldBasename />"><mt:CustomFieldName /></label>
<span class="date-time-fields">
<input type="text" name="d_customfield_<mt:CustomFieldBasename />" id="d_customfield_<mt:CustomFieldBasename />" value="<mt:CommentCustomFieldValue regex_replace="/^(\d+年\d+月\d+日).*$/","$1">" />
<input type="text" name="t_customfield_<mt:CustomFieldBasename />" id="t_customfield_<mt:CustomFieldBasename />" value="<mt:CommentCustomFieldValue regex_replace="/^.*\s(.*)$/","$1">" />
</span>
  </mt:if>
</mt:CommentCustomFields>
オブジェクトの場合
<mt:CommentCustomFields>
  <mt:if tag="CustomFieldType" eq="embed">
<label for="customfield_<mt:CustomFieldBasename />"><mt:CustomFieldName /></label>
<textarea name="customfield_<mt:CustomFieldBasename />" id="customfield_<mt:CustomFieldBasename />"><mt:CommentCustomFieldValue></textarea>
  </mt:if>
</mt:CommentCustomFields>- Movable Typeのカスタムフィールドのオプションの表示名を表示する方法
- Movable Typeの日付カスタムフィールドを使って「予定」「開催中」「終了」を別々に表示する方法
- Movable Typeの日付カスタムフィールドを2つ使って「開催中」を表示する方法
- Movable Typeの日付カスタムフィールドを使って現在時刻と比較する方法
- Movable Typeのカスタムフィールドに入力した複数のブログ記事IDからブログ記事リストを出力する
- Movable Typeのポップアップコメントにカスタムフィールドを表示する
- コメントカスタムフィールドの値をクッキーに保存する方法
- Movable Typeのサインアップ画面に表示するカスタムフィールドの順序を並べ替える
- コメント用カスタムフィールドの投稿フォームのカスタマイズ(その2)
- コメント用カスタムフィールドの投稿フォームのカスタマイズ(その1)
- 特定のカスタムフィールドの情報を出力する(その2)
- 特定のカスタムフィールドの情報を出力する
- Movable Type 5.0 のカスタムフィールドをカテゴリで振り分ける
- カスタムフィールドの入力文字数が改善
- mt-csv2customfields v0.02

