Windows+ApacheでSSLを有効にする方法
Windows+ApacheでSSLを有効にする方法を紹介します。
1.はじめに
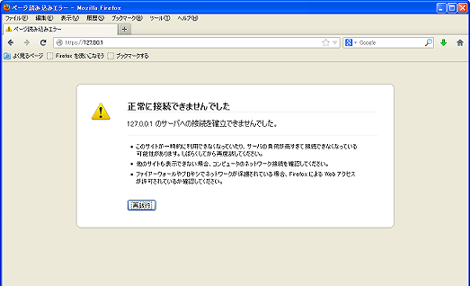
WindowsにApacheを単独でインストールすると、http://~でローカルPCのファイルにアクセスできるようになりますが、https://~では、次のような読み込みエラーになってアクセスすることができません。
ちなみにXAMPPではデフォルト状態でhttpsアクセスできるようです。
ということで、Windows上でhttps://~でローカルPCのファイルにアクセスできるようにする手順を解説します。
httpsでアクセスできるようにするためには、Apacheに同梱されているopenssl.exeを使って秘密鍵・公開鍵・証明書を作成する必要があります。
利用しているApacheのバージョンは2.4.7です。Apacheは「C:\Apache24」にインストールした状態で説明を進めます。
なお、前提としてSSL対応のApacheを利用する必要があります。その部分についての説明はこのエントリーでは省略していますが、今回利用したApacheのダウンロードについて、最後の方で解説しています。
2.秘密鍵(server.key)の生成
Apacheインストールディレクトリのbinに移動して、以下のコマンドを実行します。
C:\Apache24\bin>openssl.exe genrsa -out ..\conf\server.key 1024実行イメージ
C:\Apache24\bin>openssl.exe genrsa -out ..\conf\server.key
Loading 'screen' into random state - done
Generating RSA private key, 1024 bit long modulus
...............................++++++
.............................................++++++
e is 65537 (0x10001)
これでC:\Apache24\confに秘密鍵(server.key)が生成されます。
ネットで調べたところ、実行するコマンドパラメータの違いでパスワードを求められたり、パスワードの解除などの手順が必要みたいですが、ここで示す方法であればそれらの手順は不要となります。
3.公開鍵(server.csr)の生成
2項と同じディレクトリで以下のコマンドを実行します。
C:\Apache24\bin>openssl.exe req -new -key ..\conf\server.key -out ..\conf\server.csr -config ..\conf\openssl.cnf実行すると、
- Country Name(国コード:日本の場合は"JP")
- State or Province Name(都道府県)
- Locality Name(市区町村)
- Organization Name(組織)
- Organizational Unit Name(部門)
- Common Name(SSLを使うIPアドレスまたはサイト名)
- Email Address(メールアドレス)
- A challenge password(証明書を破棄する場合のパスワード)
- An optional company name(別の組織名)
について入力を求められるので、適当な内容を入力します(以下赤色部分)。最後の2項目は必須ではないため入力不要です。
実行イメージ
C:\Apache24\bin>openssl.exe req -new -key ..\conf\server.key -out ..\conf\server
.csr -config ..\conf\openssl.cnf
Loading 'screen' into random state - done
You are about to be asked to enter information that will be incorporated
into your certificate request.
What you are about to enter is what is called a Distinguished Name or a DN.
There are quite a few fields but you can leave some blank
For some fields there will be a default value,
If you enter '.', the field will be left blank.
-----
Country Name (2 letter code) [AU]:JP
State or Province Name (full name) [Some-State]:Tokyo
Locality Name (eg, city) []:City
Organization Name (eg, company) [Internet Widgits Pty Ltd]:Company
Organizational Unit Name (eg, section) []:Section
Common Name (e.g. server FQDN or YOUR name) []:127.0.0.1
Email Address []:foo@bar.com

Please enter the following 'extra' attributes
to be sent with your certificate request
A challenge password []:
An optional company name []:
これでC:\Apache24\confに公開鍵(server.csr)が生成されます。
4.証明書(server.crt)の生成
2項と同じディレクトリで以下のコマンドを実行します。
C:\Apache24\bin>openssl.exe x509 -in ..\conf\server.csr -out ..\conf\server.crt -req -signkey ..\conf\server.key -days 365実行イメージ
C:\Apache24\bin>openssl.exe x509 -in ..\conf\server.csr -out ..\conf\server.crt
-req -signkey ..\conf\server.key -days 365
Loading 'screen' into random state - done
Signature ok
subject=/C=JP/ST=Tokyo/L=City/O=Company/OU=Section/CN=127.0.0.1/emailAddress=foo@bar.com
Getting Private key
これでC:\Apache24\confに証明書(server.crt)が生成されます。
5.httpd-ssl.confの修正
C:\Apache24\conf\extra\httpd-ssl.confの以下の赤色部分を修正し、ドキュメントルートを適切な内容にします。
…前略…
#   General setup for the virtual host
DocumentRoot "c:/Apache24/htdocs"
…後略…
今回のサンプルでは修正せずにそのまま使っています。
6.httpd.confの修正
C:\Apache24\conf\httpd.confを任意のエディタで開き、以下の行を修正します。
mod_sslを有効にします。
修正前
#LoadModule ssl_module modules/mod_ssl.so修正後
LoadModule ssl_module modules/mod_ssl.soまた、httpd-ssl.confを読み込むようにします。
修正前
#Include conf/extra/httpd-ssl.conf修正後
Include conf/extra/httpd-ssl.conf修正後、Apacheを再起動します。
7.ブラウザでアクセス
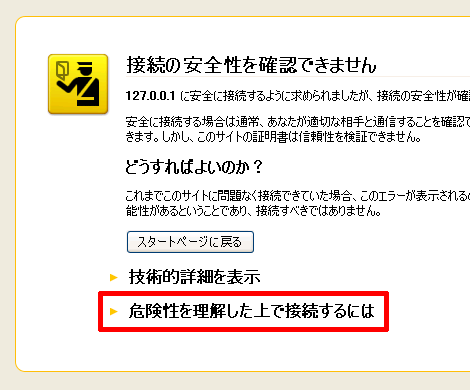
「危険性を理解した上で接続するには」をクリック。
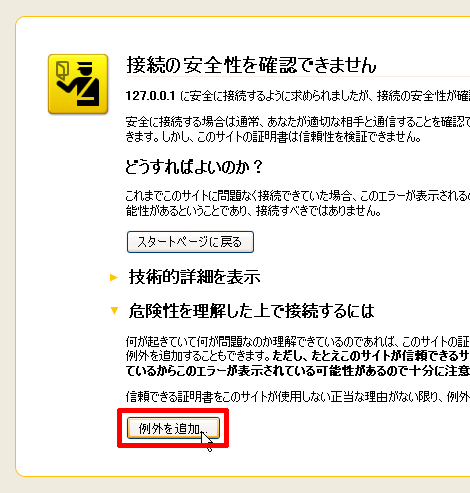
「例外を追加」をクリック。
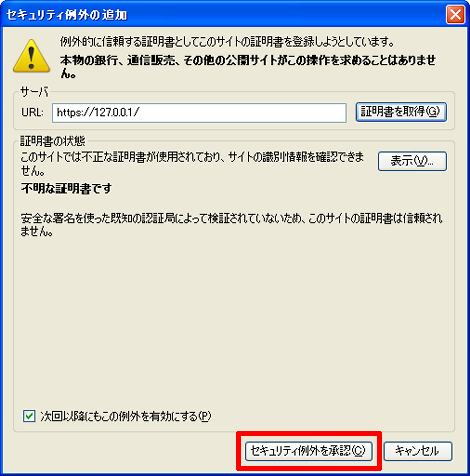
「セキュリティ例外」を承認をクリック。
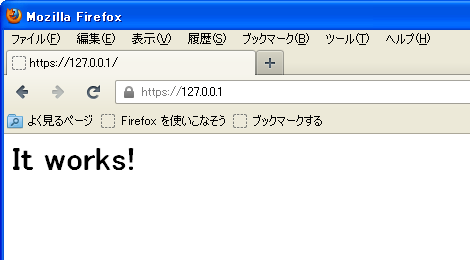
これで表示されました。
8.SSL対応のApacheのダウンロード
今回使ったSSL対応のApacheは以下です。
http://www.apachelounge.com/download/win32/
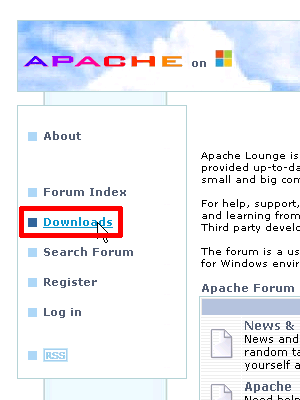
「Apache Lounge」のページにアクセスして、左側にある「Downloads」をクリック。
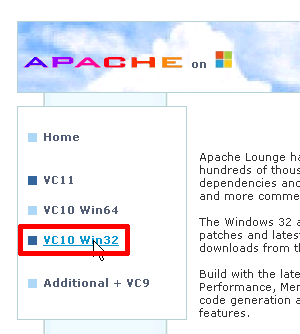
左側にある「VC10 Win32」をクリック。
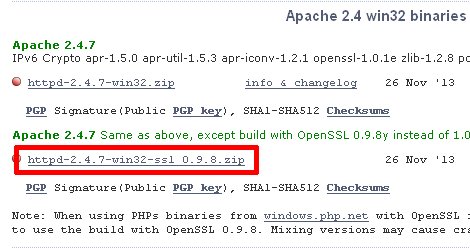
「httpd-2.4.7-win32-ssl_0.9.8.zip」をクリック
9.その他
Apache起動時、httpd-ssl.confで以下のエラーが発生しました。
C:\Apache24\bin>httpd
AH00526: Syntax error on line 76 of C:/Apache24/conf/extra/httpd-ssl.conf:
SSLSessionCache: 'shmcb' session cache not supported (known names: ). Maybe you
need to load the appropriate socache module (mod_socache_shmcb?).
このエラーを回避するために、httpd-ssl.confの以下の行をコメントアウトしました。
修正前
#   Inter-Process Session Cache:
#   Configure the SSL Session Cache: First the mechanism
#   to use and second the expiring timeout (in seconds).
#SSLSessionCache         "dbm:c:/Apache24/logs/ssl_scache"
SSLSessionCache        "shmcb:c:/Apache24/logs/ssl_scache(512000)"
SSLSessionCacheTimeout  300
修正前
#   Inter-Process Session Cache:
#   Configure the SSL Session Cache: First the mechanism
#   to use and second the expiring timeout (in seconds).
#SSLSessionCache         "dbm:c:/Apache24/logs/ssl_scache"
#SSLSessionCache        "shmcb:c:/Apache24/logs/ssl_scache(512000)"
#SSLSessionCacheTimeout 300- PHPをビルドしてApacheと連携させる方法
- ApacheのCGIでソースが表示される場合の対処
- Apache 2.4 系をソースからインストール
- 「php_flag short_open_tag off」の意味
- mod_rewriteの動作を確認する方法
- WindowsにApacheを簡単にインストールする方法
- Apacheログのリクエスト時間にミリ秒・マイクロ秒を表示する
- Windows + XAMPP + OpenSSL
- PHP における「モジュール版」と「CGI 版」の比較 + WordPress の適用例
- Apache のチューニング(その3)・DiceによるWindows再起動
- Apache のチューニング(その2)
- Apache のチューニング(その1)
