Apache 2.4 系をソースからインストール
LinuxにApache 2.4 系をソースからインストールする手順を紹介します。
1.アーカイブのダウンロードと展開
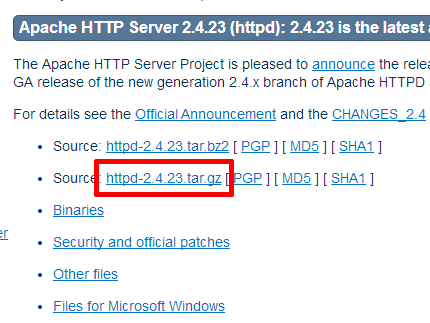
Apacheのダウンロードのページにアクセスして、「httpd-2.4.23.tar.gz」をクリック。

ダウンロードしたアーカイブを任意のディレクトリで展開します。
<pre><code>[root@file tmp]# tar zxvf httpd-2.4.23.tar.gz
httpd-2.4.23/
httpd-2.4.23/.deps
httpd-2.4.23/.gdbinit
httpd-2.4.23/ABOUT_APACHE
 :
httpd-2.4.23/build/aix/README</code></pre>
2.configure実行(1回目)
configureを実行しますが、「APR not found」というエラーが発生します。
[root@file tmp]# cd httpd-2.4.23/
[root@file httpd-2.4.23]# ./configure
checking for chosen layout... Apache
checking for working mkdir -p... yes
checking for grep that handles long lines and -e... /usr/bin/grep
checking for egrep... /usr/bin/grep -E
checking build system type... x86_64-unknown-linux-gnu
checking host system type... x86_64-unknown-linux-gnu
checking target system type... x86_64-unknown-linux-gnu
configure:
configure: Configuring Apache Portable Runtime library...
configure:
checking for APR... no
configure: error: APR not found.  Please read the documentation.
3.APR と APR-Utilの準備
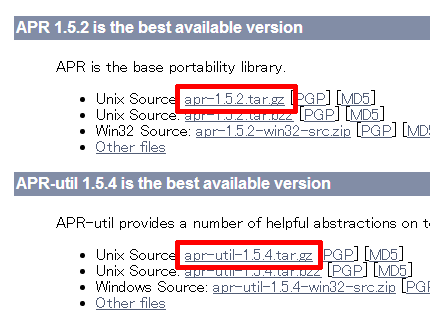
Apache Portable Runtimeのダウンロードのページにアクセスして、
- apr-1.5.2.tar.gz
- apr-util-1.5.4.tar.gz
をダウンロード。

サーバにアップロードして展開します。
[root@file tmp]# tar -zxvf apr-1.5.2.tar.gz
apr-1.5.2/
apr-1.5.2/config.layout
apr-1.5.2/build.conf
 :
apr-1.5.2/libapr.rc
[root@file tmp]# tar -zxvf apr-util-1.5.4.tar.gz
apr-util-1.5.4/
apr-util-1.5.4/libaprutil.dep
apr-util-1.5.4/xlate/
 :
apr-util-1.5.4/encoding/apr_base64.c
展開したディレクトリをApacheのsrclibディレクトリにコピー。
[root@file tmp]# cp -Rp ./apr-1.5.2  ./httpd-2.4.23/srclib/apr
[root@file tmp]# cp -Rp ./apr-util-1.5.4 ./httpd-2.4.23/srclib/apr-util
4.configure実行(2回目)
再度configureを実行しますが、今度は「pcre-config for libpcre not found.」というえらーに遭遇します。
[root@file httpd-2.4.23]# ./configure
checking for chosen layout... Apache
checking for working mkdir -p... yes
checking for grep that handles long lines and -e... /usr/bin/grep
checking for egrep... /usr/bin/grep -E
 :
checking for pcre-config... false
configure: error: pcre-config for libpcre not found. PCRE is required and available from http://pcre.org/
5.PCREをインストール
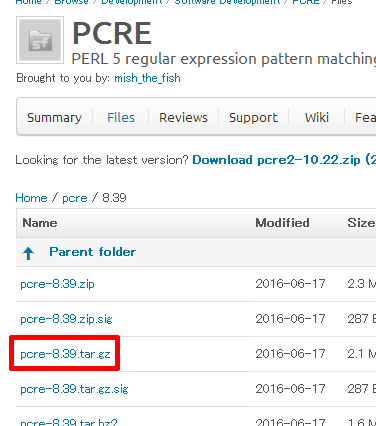
PCREのページにアクセスして、「pcre-8.39.tar.gz」をダウンロード(ソースからビルドしてインストールするのであればC++コンパイラ(g++)が必要)。

アーカイブを展開して下記を実行。
[root@file tmp]# tar xvzf pcre-8.39.tar.gz
[root@file tmp]# cd pcre-8.39
[root@file pcre-8.39]# ./configure
checking for a BSD-compatible install... /usr/bin/install -c
checking whether build environment is sane... yes
checking for a thread-safe mkdir -p... /usr/bin/mkdir -p
   :
    Link pcretest with libreadline .. : no
    Valgrind support ................ : no
    Code coverage ................... : no
[root@file pcre-8.39]# make
rm -f pcre_chartables.c
ln -s ./pcre_chartables.c.dist pcre_chartables.c
make  all-am
make[1]: ディレクトリ `/tmp/pcre-8.39' に入ります
  CC       libpcre_la-pcre_byte_order.lo
  CC       libpcre_la-pcre_compile.lo
 :
  CXX      pcre_stringpiece_unittest-pcre_stringpiece_unittest.o
  CXXLD    pcre_stringpiece_unittest
make[1]: ディレクトリ `/tmp/pcre-8.39' から出ます
[root@file pcre-8.39]# make install
make  install-am
make[1]: ディレクトリ `/tmp/pcre-8.39' に入ります
make[2]: ディレクトリ `/tmp/pcre-8.39' に入ります
 :
make[3]: ディレクトリ `/tmp/pcre-8.39' から出ます
make[2]: ディレクトリ `/tmp/pcre-8.39' から出ます
make[1]: ディレクトリ `/tmp/pcre-8.39' から出ます
6.configure実行(3回目)
これでconfigure実行が正常に終了します。
[root@file httpd-2.4.23]# ./configure
checking for chosen layout... Apache
checking for working mkdir -p... yes
checking for grep that handles long lines and -e... /usr/bin/grep
 :
config.status: creating build/config_vars.sh
config.status: creating include/ap_config_auto.h
config.status: executing default commands
7.make
makeを実行します。
[root@file httpd-2.4.23]# make
Making all in srclib
make[1]: ディレクトリ `/tmp/httpd-2.4.23/srclib' に入ります
Making all in apr
make[2]: ディレクトリ `/tmp/httpd-2.4.23/srclib/apr' に入ります
make[3]: ディレクトリ `/tmp/httpd-2.4.23/srclib/apr' に入ります
 :
make[2]: ディレクトリ `/tmp/httpd-2.4.23/modules' から出ます
make[2]: ディレクトリ `/tmp/httpd-2.4.23/support' に入ります
make[2]: ディレクトリ `/tmp/httpd-2.4.23/support' から出ます

make[1]: ディレクトリ `/tmp/httpd-2.4.23' から出ます
8.make install
make installを実行します。
[root@file httpd-2.4.23]# make install
Making install in srclib
make[1]: ディレクトリ `/tmp/httpd-2.4.23/srclib' に入ります
Making install in apr
make[2]: ディレクトリ `/tmp/httpd-2.4.23/srclib/apr' に入ります
make[3]: ディレクトリ `/tmp/httpd-2.4.23/srclib/apr' に入ります
 :
mkdir /usr/local/apache2/man/man1
mkdir /usr/local/apache2/man/man8
mkdir /usr/local/apache2/manual
make[1]: ディレクトリ `/tmp/httpd-2.4.23' から出ます
これでApacheのインストールが完了しました。
Posted by yujiro このページの先頭に戻る
- PHPをビルドしてApacheと連携させる方法
- ApacheのCGIでソースが表示される場合の対処
- 「php_flag short_open_tag off」の意味
- mod_rewriteの動作を確認する方法
- WindowsにApacheを簡単にインストールする方法
- Windows+ApacheでSSLを有効にする方法
- Apacheログのリクエスト時間にミリ秒・マイクロ秒を表示する
- Windows + XAMPP + OpenSSL
- PHP における「モジュール版」と「CGI 版」の比較 + WordPress の適用例
- Apache のチューニング(その3)・DiceによるWindows再起動
- Apache のチューニング(その2)
- Apache のチューニング(その1)
トラックバックURL
コメントする
greeting

